在 2.x 版本里,不管数据多大,都会在一开始就为其创建观察者。当数据很大时,这可能会在页面载入时造成明显的性能压力。3.x 版本,只会对「被用于渲染初始可见部分的数据」创建观察者,而且 3.x 的观察者更高效。
二、更精准的变更通知。
举例来说:2.x 版本中,使用 Vue.set 来给对象新增一个属性时,这个对象的所有 watcher 都会重新运行;3.x 版本中,只有依赖那个属性的 watcher 才会重新运行。
三、3.0 新加入了 TypeScript 以及 PWA 的支持
四、部分命令发生了变化:
1.下载安装 npm install -g vue@cli
2.删除了vue list
3.创建项目 vue create
4.启动项目 npm run serve
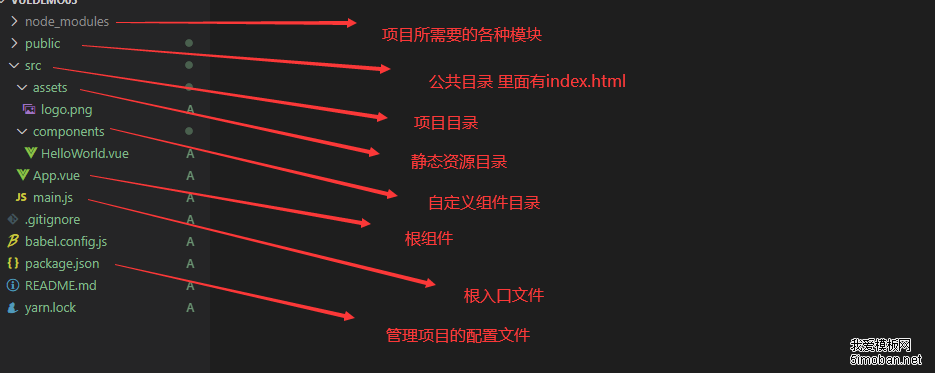
五、默认项目目录结构也发生了变化:
移除了配置文件目录,config 和 build 文件夹
移除了 static 文件夹,新增 public 文件夹,并且 index.html 移动到 public 中
在 src 文件夹中新增了 views 文件夹,用于分类 视图组件 和 公共组件:

六、使用上的变化
1.Data
export default {
  data(){
    return{

    }
  }
},
取而代之是使用以下的方式去初始化数据:
<template>
  <div class="hello">
    123
  </div>
  <div>{{name.name}}</div>
</template>
import {reactive} from 'vue'
export default {
 setup(){
   const name = reactive({
     name:'hello 番茄'
   })
   return {name}
 }
}
tip:在新版当中setup等效于之前2.0版本当中得到beforeCreate,和created,它是在组件初始化的时候执行,甚至是比created更早执行。值得注意的是,在3.0当中如果你要想使用setup里的数据,你需要将用到值return出来,返回出来的值在模板当中都是可以使用的。假设如果你不return出来,而直接去使用的话浏览器是会提醒你:
runtime-core.esm-bundler.js?5c40:37 [Vue warn]: Property "name" was accessed during render but is not defined on instance.
at <Anonymous>
at <Anonymous> (Root)
这个也是3.0当中需要注意的地方。细心的朋友应该已经发现,我在模板里放入2个子节点,其实这个在2.0里是不被允许的,这也是3.0的一项小的改变 reactive是3.0提供的一个数据响应的方式,它主要是对对象进行数据响应,接下来会介绍另一种数据响应的方式ref。
2.Method
<template>
  <div class="hello">
    <div>{{name.name}}</div>
    <div>{{count}}</div>
    <button @click="increamt">button</button>
  </div>
</template>

<script>
import {reactive,ref} from 'vue'
export default {
 setup(){
   const name = reactive({
     name:'王'
   })
   const count=ref(0)
   const increamt=()=>{
     count.value++
   }
   return {name,count,increamt}
 }
}
在介绍Method的代码中,我引用了vue提供的ref新函数,它的作用是用来创建一个引用值,它主要是对String,Number,Boolean的数据响应作引用。也许有人会问,为什么不直接给count赋值,而是采用ref(0)这样的方式来创建呢,按我的理解就是,如果直接给count赋值就是等于把这个值直接抛出去了,就很难在找到它,而采用ref这种方法等于你在向外抛出去值的是同时,你还在它身上牵了一根绳子,方便去追踪它。需要注意的时,在ref的函数中,如何你要去改变或者去引用它的值,ref的这个方法提供了一个value的返回值,对值进行操作。

3.LifeCycle(Hooks) 3.0当中的生命周期与2.0的生命周期出现了很大的不同:
beforeCreate -> 请使用 setup()
created -> 请使用 setup()
beforeMount -> onBeforeMount
mounted -> onMounted
beforeUpdate -> onBeforeUpdate
updated -> onUpdated
beforeDestroy -> onBeforeUnmount
destroyed -> onUnmounted
errorCaptured -> onErrorCaptured
如果要想在页面中使用生命周期函数的,根据以往2.0的操作是直接在页面中写入生命周期,而现在是需要去引用的,这就是为什么3.0能够将代码压缩到更低的原因。
import {reactive, ref, onMounted} from 'vue'
export default {
 setup(){
   const name = reactive({
     name:'王'
   })
   const count=ref(0)
   const increamt=()=>{
     count.value++
   }
   onMounted(()=>{
     console.log('123')
   })
   return {name,count,increamt}
 }
4.computed
<template>
  <div class="hello">
    <div>{{name.name}}</div>
    <div>{{count}}</div>
    <div>计算属性{{computeCount}}</div>
    <button @click="increamt">button</button>

  </div>

</template>

<script>
import {reactive, ref, onMounted,computed} from 'vue'
export default {
 setup(){
   const name = reactive({
     name:'王'
   })
   const count=ref(0)
   const increamt=()=>{
     count.value++
   }
   const computeCount=computed(()=>count.value*10)//使用computed记得需要引入,这也是刚接触3.0容易忘记的事情
   onMounted(()=>{
     console.log('123')
   })
   return {name,count,increamt,computeCount}
 }
}
</script>
5.组件使用上的区别在开始介绍3.0组件的用法之前,我们可以先回顾一下2.0使用组件的方式。 在2.0当中,哪个页面需要使用组件就在哪个页面里引入该组件,同时在页面注册这个组件。在传递参数时,父组件传递参数给子组件,子组件就会接收父组件传递过来的参数。
举个栗子:
<template>
  <div id="app">
    <HelloWorld msg="Welcome to Your Vue.js App"/>
  </div>
</template>

<script>
import HelloWorld from './components/HelloWorld.vue'

export default {
  name: 'App',
  components: {
    HelloWorld
  }
}
</script>
子组件
<template>
  <div class="hello">
    <h1>{{ msg }}</h1>
  </div>
</template>

<script>
export default {
  name: 'HelloWorld',
  props: {
    msg: String
  },
  data(){
    return{

    }
  },
  method:{
    handleClick(){
      this.$emit('childclick','123')
    }
  }
}
</script>
以上是最常见的父子组件之间的调用,但是在vue3.0中就存在差异。父组件:
<template>
  <div class="hello">
    <div>123</div>
  <NewComp :name="name" @childClick="parentClick"/>
  </div>

</template>

<script>
import {reactive} from 'vue'
import NewComp from './newComp.vue'
export default {
  components:{
    NewComp
  },
 setup(){
   const name=reactive({
     name:'hello 番茄'
   })
   const parentClick=(e)=>{
     console.log(e)
     console.log('123')
   }
   return {name,parentClick}
 }
}
</script>
子组件:
<template>
    <div>
        <button @click="handleClick">组件</button>
    </div>
</template>

<script>
export default {
    setup(props,{emit} ){
        const handleClick=()=>{
            emit('childClick','hello')
        }
        return {
            props,
            handleClick
        }
    }
}
</script>
通过上面的vue3.0父子组件之间的调用,我们不难发现,父组件当中在调用子组件时,基本与2.0相同,而在子组件当中,要想获取到父组件传递过来的参数,我们是直接在setup()中直接获取到props值和emit事件。这是因为setup为我们提供了props以及context这两个属性,而在context中又包含了emit等事件。为什么不用this.$emit的方法来向外触发子组件事件,在 Vue2,this代表的是当前组件,不是某一个特定的属性。所以我们可以直接使用this访问prop属性值。就比如下面的例子在挂载完成后打印处当前传入组件的参数title。但是在 Vue3 中,this无法直接拿到props属性,emit events(触发事件)和组件内的其他属性。不过全新的setup()方法可以接收两个参数:
props - 不可变的组件参数
context - Vue3 暴露出来的属性(emit,slots,attrs)
