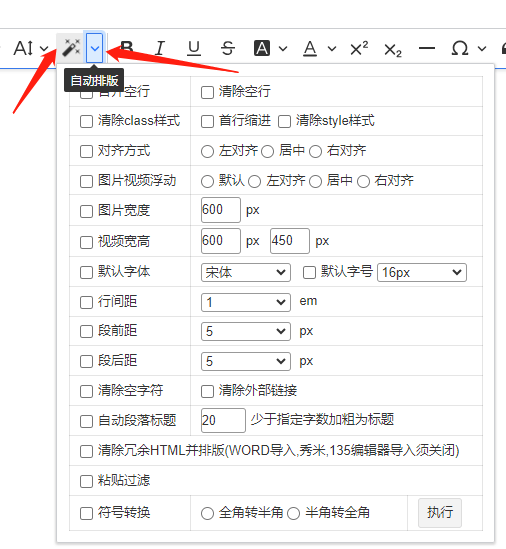
ckeditor5插件开发之编写可下拉,也可直接点击执行的插件,本文是基于vue3使用ck-editor5这篇文章来实现的。先看下效果图:

这个插件是一键排版,点击左边的“魔法棒”按钮,自动应用预先设置好的一键排版功能对文章进行排版,点击右边的下拉箭头,会弹出具体的设置界面,设置完点击“执行”按钮,也会根据设置,执行一键排版。当然,由于一键排版功能并不完善,这里就不放出代码了。这里仅仅记录如何实现标题所述功能:
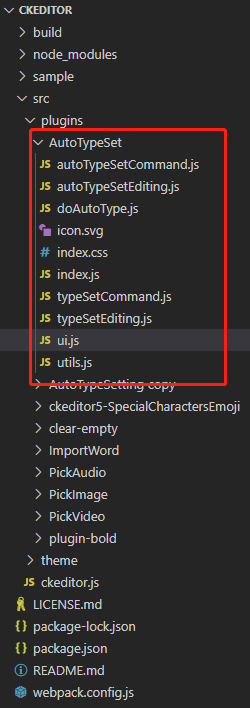
1、在ckeditor编辑器的src/plugins下,新建AutoTypeSet文件夹,并新建如下文件:

主要文件作用描述:
autoTypeSetCommand.js - 自动排版被点击时执行的操作
autoTypeSetEditing.js - 自动排版command绑定
doAutoType.js - 此为自动排版逻辑,非必要
typeSetCommand.js - 手动排版(即箭头点击下拉菜单)点击执行的操作
typeSetEditing.js - 手动排版command绑定
ui.js - ui图标设置、箭头设置等
index.js - 入口文件
2、index.js相关代码:
/**
 * @module auto-type-set/index
 */
 import { Plugin } from '@ckeditor/ckeditor5-core';
 import { AutoTypeSetUI } from './ui';
 // 自动排版
 import AutoTypeSetEditing from './autoTypeSetEditing';
 // 手动排版
 import TypeSetEditing from './typeSetEditing';

 export default class AutoTypeSetting extends Plugin {
    /**
     * @inheritDoc
     */
    static get pluginName() {
        return 'AutoTypeSetting';
    }
    /**
     * @inheritDoc
     * 必须导出UI、自动排版editing、手动排版editing文件
     */
    static get requires() {
        return [AutoTypeSetUI, AutoTypeSetEditing, TypeSetEditing];
    }
}
3、autoTypeSetEditing.js
import Plugin from "@ckeditor/ckeditor5-core/src/plugin";
import AutoTypeSetCommand from "./autoTypeSetCommand";
export default class AutoTypeSetEditing extends Plugin {
  static get pluginName() {
    return "AutoTypeSetEditing";
  }
  init() {
    const editor = this.editor;
    // 注册一个 Command 命令
    editor.commands.add('autoTypeSet', new AutoTypeSetCommand(editor));
  }
}
4、autoTypeSetCommand.js
/**
 * @module auto-type-set/command
 */
import { Command } from '@ckeditor/ckeditor5-core';
import doAutoType from './doAutoType'
import "./index.css";
export default class AutoTypeSettingCommand extends Command {
  refresh() {
    this.isEnabled = true;
  }
  execute() {
    const editor = this.editor
    // 左侧自动排版按钮点击时,执行自动排版
    doAutoType(editor)
  }
}
5、typeSetEditing.js
/**
 * @module type-set/editing
 */
import Plugin from "@ckeditor/ckeditor5-core/src/plugin";
import TypeSetCommand from "./typeSetCommand";
export default class TypeSetEditing extends Plugin {
  static get pluginName() {
    return "TypeSetEditing";
  }
  init() {
    const editor = this.editor;
    // 注册一个 Command 命令
    editor.commands.add('typeSet', new TypeSetCommand(editor));
  }
}
6、typeSetCommand.js
/**
 * @module type-set/command
 */
import { Command } from '@ckeditor/ckeditor5-core';
// 箭头点击后弹出框的样式
import "./index.css";
export default class AutoTypeSettingCommand extends Command {
  refresh() {
    this.isEnabled = true;
  }
  execute() {
    // 无需执行任何内容,因为在弹窗里,按钮点击执行了
  }
}
7、ui.js,此文件主要绑定了按钮和自动、手动排版功能
/**
 * @module auto-type-set/ui
 */
 import { Plugin } from '@ckeditor/ckeditor5-core';
 import { SplitButtonView, createDropdown } from 'ckeditor5/src/ui';
 // 箭头左侧按钮
 import autoTypeSetIcon from './icon.svg';
 import doAutoType from './doAutoType'

 export class AutoTypeSetUI extends Plugin {
    /**
     * @inheritDoc
     */
    static get pluginName() {
        return 'AutoTypeSetUI';
    }

    /**
     * UI初始化
     */
    init() {
        const editor = this.editor;
        const componentCreator = (locale) => {
            return this._createDropdownView(locale);
        };
        editor.ui.componentFactory.add('autoTypeSet', componentCreator);
        editor.ui.componentFactory.add('typeSet', componentCreator);
    }
    _createDropdownView(locale) {
        const editor = this.editor;
        const autoTypeSetCommand = editor.commands.get('autoTypeSet');
        const typeSetCommand = editor.commands.get('typeSet');
        this.dropdownView = createDropdown(locale, autoTypeSetCommand ? SplitButtonView : undefined);
        // buttonView 是左边的按钮
        const buttonView = this.dropdownView.buttonView;
        // panelView 是右边的箭头点击后弹出来的容器
        const panelView = this.dropdownView.panelView;
        buttonView.set({
            label: '自动排版',
            icon: autoTypeSetIcon,
            tooltip: true
        });
        // 给自动排版绑定command事件,弹出来的手动排版不用绑定command事件,事件是由里面的“执行”按钮绑定
        this.listenTo(buttonView, 'execute', () => {
            editor.execute('autoTypeSet');
            editor.editing.view.focus();
        });
        panelView.extendTemplate({
            attributes: {
                class: 'ck-image-insert__panel'
            }
        });

        return this._setUpDropdown(autoTypeSetCommand || typeSetCommand);
    }
    // 给 panelView 添加内容
    _setUpDropdown(command) {
        const editor = this.editor;
        const dropdownView = this.dropdownView;
        const panelView = dropdownView.panelView;
        dropdownView.bind('isEnabled').to(command);
        // 监听一次弹出
        dropdownView.once('change:isOpen', () => {
            const _html = `
                <table class="hmy-auto-type-setting-table">
                    // 弹出的排版设置界面,这里省略
                </table>
            `
            panelView.element.innerHTML = _html
            panelView.element.querySelector('.submitBtn').addEventListener('click', function() {
                doAutoType(editor, panelView.element)
                editor.editing.view.focus();
                dropdownView.isOpen = false;
            })
            panelView.element.querySelector('td').addEventListener('click', function(event) {
                event.stopPropagation()
                event.cancelBubble = true
            })
        });
        return dropdownView;
    }
}
8、开发完,运行npm run build,打包,然后将打包后的文件复制到项目中,使用,详见:ckeditor5编写一个上传word的插件,ckeditor5导入word插件一文的三~七步
